Showing posts with label ATCs. Show all posts

Tuesday, November 21, 2017

Under the Sea Creatures ATCs

ATCs (artist trading cards) are such fun things to make. This theme was "Creatures of the Sea". Of course I had to use the Dylusions "Under the Sea" stamp set... they're too adorable to not use at every opportunity!
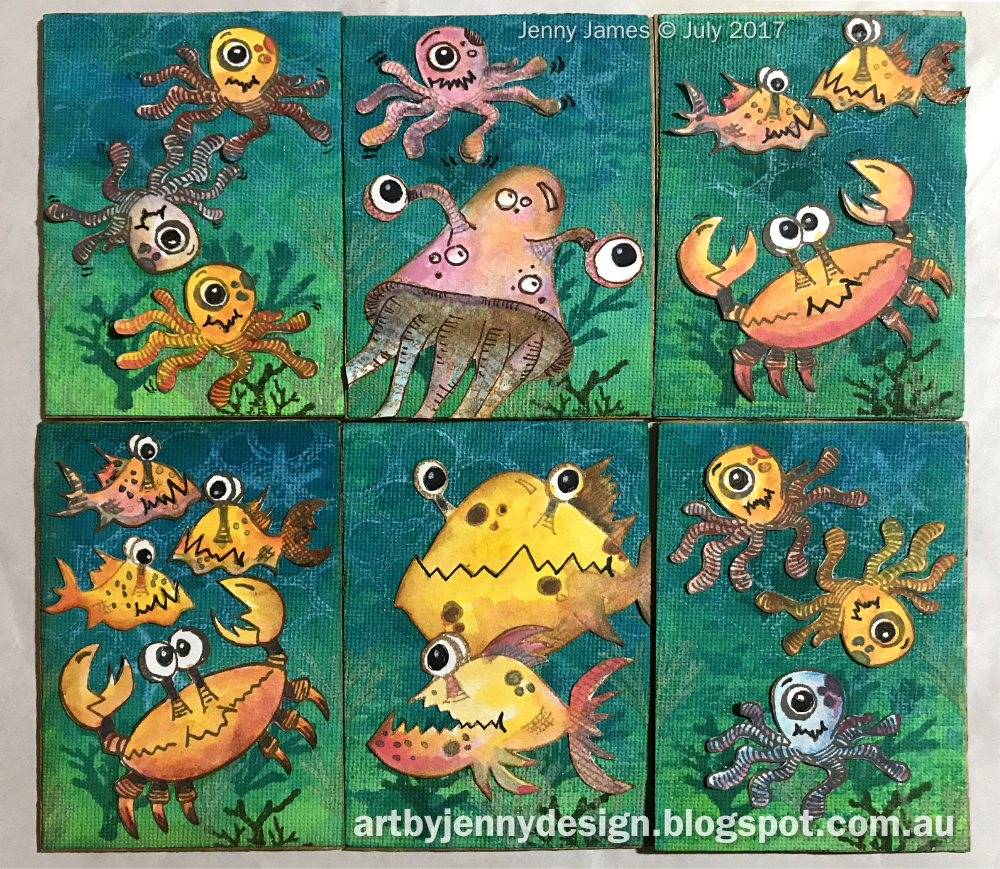
Creatures Under the Sea - Art Trading Cards by Jenny using Dylusions and Darkroom Door stamps

The first thing I did was cut up a sheet of Sticky-Back Canvas into 2 1/2" x 3 1/2" rectangles and then spray them with Dylusions ink spray in Calypso Teal and then Lemon Zest.
Before it dried I stamped with Distress Ink in Forest Moss with the Darkroom Door background stamp, Peeled Paint. The next layer was the seaweed and coral from the Darkroom Door stamp set, Under the Sea with Distress Inks in Chipped Sapphire and Forest Moss.


On top of this I inked up the Darkroom Door background stamp Circles with water. I have a Dylusions empty ink pad filled with water for this purpose. I like how the water reacts with the inks and lightens the colours. After all this dried I stamped a starfish using Distress Ink in Picket Fence. Lastly, I used the seaweed and coral stamps again but this time using Distress Oxide Ink in Fossilized Amber.


Overall, the background turned out really well. This photo was taken after it dried. Before this, it didn't have the same contrasts with the bubbles and starfish. The combination of Distress Inks and Distress Oxides is fantastic. Being slightly opaque, the Distress Oxides give layers a bit of depth as it gives the illusion of being in the foreground.


I usually colour my critters before cutting them out and then use Distress Ink with a blending tool to stain the edges. Things you notice after a photo is taken - the fish in the top right looks so cheeky trying to eat the octopus left behind on the scrap paper.


The above pic is a closeup of the little crab and his friends. You can see how the smooth mixed media paper contrasts with the cool texture of the sticky-back canvas.

These art trading cards were made for the June 2017 swap ... I'm just a bit slow at uploading to my blog! No wonder I couldn't find this post the other day, it was still in drafts!

Thanks for checking out my blog. I hope it made you smile :)


Here are the products I used to make these mini masterpieces...


Dylusions Cling Rubber Stamps - Plenty of Fish in the Sea
Background Stamp - Circles - Darkroom Door
Background Stamp - Peeled Paint - Darkroom Door
Rubber Stamp Set - Seashells - Darkroom Door
picture of 3 Tim Holtz Distress Ink Pads
Tim Holtz Distress Ink and Oxide Ink Pads
Dylusions Ink Spray - Calypso Teal and other colours
Dylusions Cling Rubber Stamps - Under the Sea
Dylusions Cling Rubber Stamps - Ocean Background
Ranger Sticky-Back Canvas - White - 5 Sheets

Saturday, July 15, 2017

Love Birds ATCs

These ATCs were made for a swap with the FB Art Swap Group for the theme "Feathers".


I used Darkroom Door stamp sets 'Feathers' and 'Love Birds' with Distress Inks, Liquitex mixed media paper and mulbury paper. 


Firstly I inked and stamped feather stamps onto the mulbery paper using Distress ink in Peeled Paint, Twisted Citron, Tea Dye and Peacock Feathers. I just kept inking and layering feathers until I liked what I saw.


They had to be put aside to dry as I used so much ink!

The love birds were inked with Squeezed Lemonade, Rusty Hinge, Twisted Citron and Peacock Feathers (with Pumice Stone for the feet) at the same time before stamping onto the mixed media paper. Normally I'd use my watercolour markers but my yellow is dry so used ink pads instead... not as accurate but it still worked. 

fyi... To refill Distress markers, pull out the brush nib, add a few drops of the same colour Reinker using the eye dropper then put the nib back in.


Their beaks were coloured afterwards with Barn Door and the eyes with black Sharpie. Edges were inked with Pumice Stone... inking edges always seems to finish off pieces and lift them from the surface.

The branch was inked with Walnut Stain and cut separately from the birds.
The words 'love birds' were stamped in black Archival ink.
All were handcut (fussy cut) including the little heart (in mulbery paper) before sticking into place.

Retail therapy links...
Distress Inks https://www.shop.artbyjenny.com.au/collections/distress-by-tim-holtz (msg to order any not here) 

Thanks for reading :) Hope they make you smile!

Monday, October 13, 2014

Making Art a Priority... Every Day

I'm getting closer to creating some sort of art every single day! Its awesome :)

This week I finished off my little thank you cards that were created using Dylusions Ink Spray and Darkroom Door stamps. All the dragonflies are now attached to stop them flying away, and the insides use the "Stay calm, smile and create beautiful things" stamp that I chatted about here. On the back is my logo and contact details... giving them a professional finish.


Its always good to have a professional polish on things, even handcreated things :) Its like putting decorations on a cake... all cakes look fantastic with icing, but decorations (whether handmade icing roses or plastic 'happy birthday' signs) make them look amazing.

This week I joined in an art swap with a Facebook craft group. Its a great group - we all encourage each other to be crafty and creative - the amount of beautiful artwork and crafted items everybody makes every day is incredible. It inspires me to ignore dishes and housework and get into my much loved studio.

Of course, then I get stressed out that the house is a mess or we've run out of clean clothes, but I'm getting closer to finding some sort of balance... which is nice.

The swap I joined was to make 2 flat (like large bookmarks) handcrafted spools, or cotton reels. I started with a sheet of Tim Holtz's Grungeboard (which smells like leather, love it) and cut out 2 spool shapes (I like the old wooden spools, so used that shape). I then trimmed to size a sheet of orange, brown and gold printed paper that I had in my paper stash. I'd made it using my Gelli Arts Gelli printing plate, paints and stencils.

On the back I used a piece of what I call lace paper. Its a white, handmade looking paper with raised flowers trailing all over one side. I painted the lace paper with Liquitex paints in yellows and brown mixed with a matte medium (which can be used as a glue, sealer or varnish).


Once dry, I sanded the edges - it gives them a great smooth finish while a the same time, ensures the edges don't get tattered (unless you want them tattered, which I didn't). Then inked the edges using the beautiful brown walnut Distress ink with a blender tool (as you do!).

Next, I gathered hessian leftovers from the previous day's craft session and wrapped them around the spool, making it look like a spool of string. I realise the idea is to make the spools look like something else other than a spool, but the embroider in me just couldn't resist!!!

Of course they needed a needle as well - made from Grungeboard and silver Inca paste (for something different to paint). Usually Inca paste is polished to a high sheen once dry but the more I polished the more the paste came off... it didn't like adhering to the porous board much, so I've left it 'raw' Inca. They're not as shiny as they could be but they look ok, sort of like oversized, well used needles.

They were finished but missing something... so I played around with my border punches and added it to both sides of the spools. Then added a few of the scraps as well.

They fly out tonight on their way to Canada to be with their new owner. I love them and hopefully my swap partner will too!

I'm off to the studio now to take photos of the new wooden shapes the talented Ray of Wood'n Marbles has created - Halloween witches and cats! They're ATC sized and are totally gorgeous.


Aren't they awesome? There are two sizes - small and large - and they're available exclusively at my Art by Jenny online shop. All wooden shapes in my shop are also available in watercolour paper, smooth white cardstock or textured cardstock (black or white) - contact me to order yours today!
Click here to view and buy wooden shapes for Halloween and other projects.

Thanks for reading my blog and I'll see you next time!

Happy Creative Day!
:)
Jenny

Thursday, February 27, 2014

Me, Myself and Art

Sometimes a girl feels the need to talk about herself and the things she loves most in the world (apart from family, friends, animals and our planet). For me, that thing is ART!!!

I'm a bit of a craft nut... you all know this, and if you didn't, a quick stroll through my blog or Facebook page will show you.

In between working on logos and books, I draw, paint, create, crochet, knit and draw some more... and colour in! Projects on the go include ATCs for swaps, painting, cardmaking, tangling, art journaling, my Project Life album, scrapbook layouts, mixed media canvas of a pelican, cross stitched pictures (haven't touched for years but still will finish one day), a large embroidered tablecloth (that my Dad started for his Mum when he was 19 yo), a wool embroidered blanket, crocheted fingerless gloves, scarves and beanies, and knitted kittens... keeps me out of trouble!

Well, in Facebook I found a few groups that have challenges and swaps. These groups are so much fun and creative! 
The chatting and laughing is great - so many LOL's and OMG's and comments like "Wow! That's beautiful :)".

The Craft Crazy International group managed by a wonderful person named Janet. This group is so much fun, relaxed, friendly and crafty - all crafts, not just papercraft or knitting. Each month Janet puts up a challenge and we all create something to suit the theme and send her a photo. The judges vote and the winner is announced in the group... I won last month with my gorgeous little hand knitted kittens! 


Pretty exciting hey? No prizes, except all the amazing comments about the kittens :) Who needs a prize when you get all those warm fuzzies from comments and likes? And as a bonus, people are wanting to buy their own litter of kittens, so I'm now busy knitting little paws, ears, bodies and tails!

ATC Addiction group is a place for regular ATC and card swaps organised by two friends who love ATCs - the title says it all! Last month I created a set of ATCs using the Bandana Technique - a totally fun and relaxing style. 


Basically, colour the background of the cardstock with ink (any colour, I used Dylusions Ink Sprays), stamp with your favourite stamps and then chill out with a bit of tangling over the whole lot with a white pen. I also used a polka dot brad, white Smooch, acetate for the wings and some white Enamel Accents.

The Project Life Australia Group has a Swaps Group too - They love to make and create anything to do with memory keeping. The swaps I have discovered are the Journal Card Swaps. 

Last month was "Stars" but I totally lost track of the days and didn't have time to post them in. Luckily for me, this month is all about stamped images! Yay :) My little fairy ballerinas can be used for the March swap. They've been spritzed with Glimmermist, stamped and then coloured with markers and gel pens.


I find the Project Life Group swaps a challenge to keep things nice and flat, without all the textured paints and embellishments that I love to use.
But challenging ourselves is good, it keeps our brains thinking outside the box and that usually means we get great results. Usually. Thankfully, with a bit of practice I'll improve!!! At least it photographed well.

I simply love all art and craft. I feel that its an important part of life, therefore should be a regular thing to do for everyone. Even if its just looking at art or doodling a scribbled abstract while you're on the phone. 

Could be why I'm attracted to these groups on Facebook - its all about the creativity! Love it :D

Happy Creative Day!
:)
Jenny